
With the huge haul I got from Etude House previously, I mentioned that I would share how to colours look like on skin. There was so many colours and boy, was there millions of way to match them. Here are some of the looks I have done using just the palette itself.

Look 1


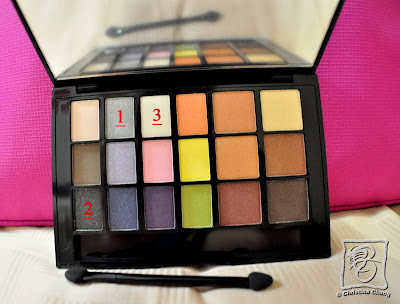
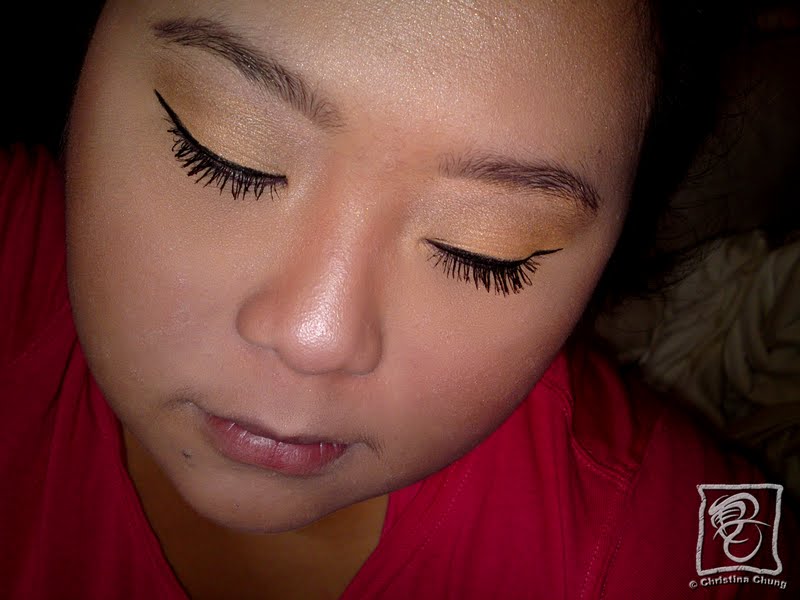
Basically, this eye makeup is created using 2 close to the lashline and blend upwards towards the brow using 1. Then I used 3 right under the brow for highlight.
I must say this is a simple shadow blending look that goes well with any type of hairstyles and dressing. Here, I added wing tip false lashes and big eye contact lens and see how "innocent" I look? :P
Look 2


Look 2 is a simple look for everyday work. I used 1 on the whole lid and dabbed a little 2 on the outer corner of eyes for depth and 3 below the brow for highlight. 4 is then drawn on the bottom eyelid with an angled brush. Finish off with your favourite eyeliner, mascara, blush and lipstick/gloss and you are good to go. Simple and fast. I got the whole look done within 10 minutes. Tell me about rush hor!

Then, I had this round plaits for hair. One big plait on the right from fringe to the back and on the right, I tied 3 small plaits and everything is pulled to a bun to the back of the hair. This would definitely keep you looking fresh all day and add a little twist to the usual boring ponytail/bun.
Look 3


This is even simpler. The whole eye makeup revolves around 2 eyeshadow colours and is suitable for night parties. I used 1 on the inner corner of eyes and 2 on the outer corners. Then, I "pulled" 2 out to create an extended wing tip and added a little highlight below the brow.
Next, I drew my eyeliner along the long wing tip and brushed my lashes with my favourite mascara and put on some dramatic eyelashes. Voila!
Hope this few looks do help you guys in transforming your looks and adding some colours to your daily life. Don't be afraid to use colours and always remember to start off using the colours lightly before building them up to stronger colours!
Have fun ~
XOXO,
Christina aka Huney

Look 1


Basically, this eye makeup is created using 2 close to the lashline and blend upwards towards the brow using 1. Then I used 3 right under the brow for highlight.
I must say this is a simple shadow blending look that goes well with any type of hairstyles and dressing. Here, I added wing tip false lashes and big eye contact lens and see how "innocent" I look? :P
Look 2


Look 2 is a simple look for everyday work. I used 1 on the whole lid and dabbed a little 2 on the outer corner of eyes for depth and 3 below the brow for highlight. 4 is then drawn on the bottom eyelid with an angled brush. Finish off with your favourite eyeliner, mascara, blush and lipstick/gloss and you are good to go. Simple and fast. I got the whole look done within 10 minutes. Tell me about rush hor!

Then, I had this round plaits for hair. One big plait on the right from fringe to the back and on the right, I tied 3 small plaits and everything is pulled to a bun to the back of the hair. This would definitely keep you looking fresh all day and add a little twist to the usual boring ponytail/bun.
Look 3


This is even simpler. The whole eye makeup revolves around 2 eyeshadow colours and is suitable for night parties. I used 1 on the inner corner of eyes and 2 on the outer corners. Then, I "pulled" 2 out to create an extended wing tip and added a little highlight below the brow.
Next, I drew my eyeliner along the long wing tip and brushed my lashes with my favourite mascara and put on some dramatic eyelashes. Voila!
Hope this few looks do help you guys in transforming your looks and adding some colours to your daily life. Don't be afraid to use colours and always remember to start off using the colours lightly before building them up to stronger colours!
Have fun ~
XOXO,
Christina aka Huney


0 comments:
Post a Comment
Feel free to give me your comments/pointers. I'll get back to you shortly. Thank you! :p