[What's New] Easter Weekend Nail Art Manicure

Labels: , , , , , , , , , , , , , ,

Hi Huneybees,


How was your Good Friday break? I spent the day hanging out with my girlfriends at Sentosa and though I'm pretty tired now, but it was definitely great to be able to catch up with them and spend some time, thrashing all the stress aside.


Here's a quick update of my DIY nail art manicure for this Easter weekend. I have a little hatching chick on the thumb, tons of painted Easter eggs as well as a bunny friend to celebrate this long weekend break.

The base for the yellow eggshell is done with the Models Own Speckled Egg nail polish, it's definitely a super fast way to get those egg looking nails! You can see more about the collection here --- http://huneyzworld.blogspot.sg/2014/06/tried-tested-models-own-speckled-egg.html.


Hope you guys like it and do share if you have Easter manicure done too!
Have a great time with your family on this weekend break~
*Ok! I have to go to bed... Night!*


 photo Signature__zpsdf69aa7c.jpg


Don’t forget to stay tuned to my blog / like my blog’s Facebook page / follow me @huney_84 on Twitter & Instagram  for the latest updates!

[Get The Look] Goodbye Mr Lee Kuan Yew Nail Art

Labels: , , , , , , , , , , , , , , ,

Hi Huneybees,


Last week was a tough week to get through as the nation waves goodbye to our founding father - Mr Lee Kuan Yew. He was cremated last Sunday and aside from dressing in black, I also did a set of monochrome nails as a tribute to him.


This black ribbon image was circulated around social media within a few hours, so I wanted to do my set of nail art, revolving around the image. But getting the image drawn right is definitely not easy to do freehand. So, I wana show ya my little trick, this might be able to help those who find it difficult to draw with your left hand (if you are right handed) too.


  1. After measuring nail bed size, I got the image shrunk down to around that size and did a tracing of the image (you can draw instead of tracing too!).
  2. Find a transparent file and slot the drawing in between, or you can use a plastic bag as well.
  3. Paint a layer of the topcoat on the plastic file, covering more than the drawing.
  4. Using acrylic paint or nail polish, start painting and draw up your image.
  5. Once dried, paint a layer of topcoat again, covering more of your drawing dimension.
  6. Let the image dry. Normally it takes up to 2 hours, but I like to let it dry over night.
  7. Using a tweezer, slowly pull up the image, starting from the corners and work your way in. Do not pull too hard as you might break it.
  8. After painting your base nail colour, apply a thin layer of top coat for the newly made "sticker" to stick on.
  9. Press down to remove bubbles and trim the size if it's too big.
  10. Once done, apply topcoat and you are done!

    Note: I did a little touch up on the drawing after sticking on, so that the image fills up the thumb. 


Voila! This is a close up of the other fingers. I did a PAP symbol as well and freehand drew on those black ribbons and Singapore Flag. Hope this little trick helps you to perfect your DIY nail art, bringing your work to another level. 


Do you guys have any other tricks to share? Would love to hear about it. :)


 photo Signature__zpsdf69aa7c.jpg


Don’t forget to stay tuned to my blog / like my blog’s Facebook page / follow me @huney_84 on Twitter & Instagram  for the latest updates!

[What's New] To Gel Or Not To Gel - Etude House Enamel ting Gel Nails Collection

Labels: , , , , , , , , , , , , , , , ,

Hi Huneybees,


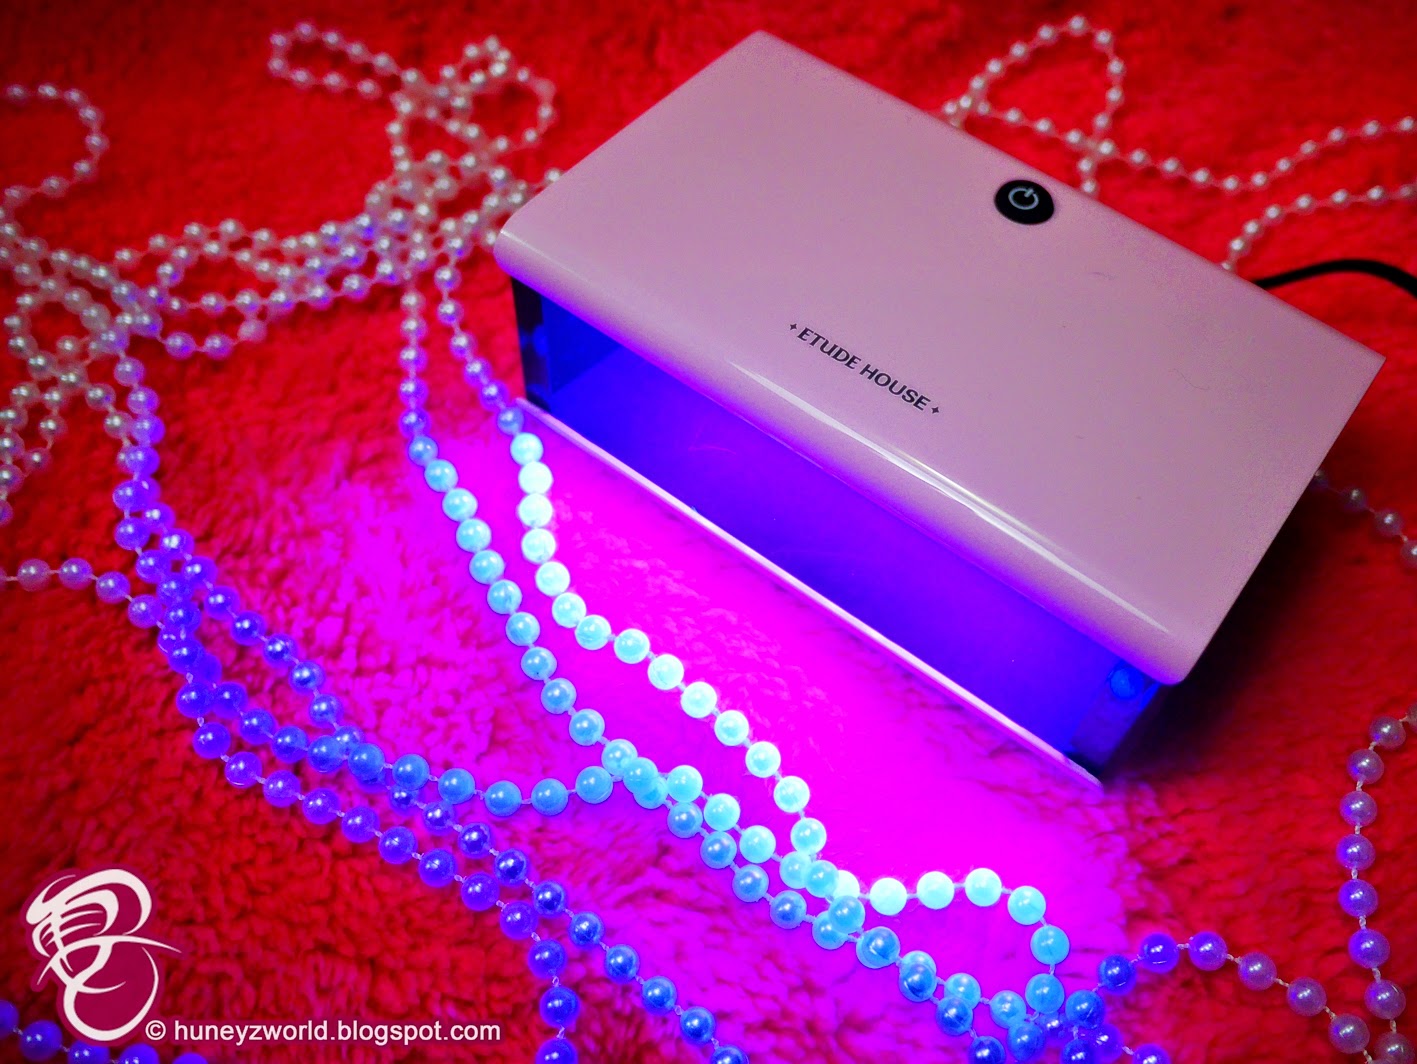
Etude House has recently joined in the gel nails trend in K-beauty and launched a new affordable series of nail products - Enamel ting Gel Nails collection, allowing you to have your very own nail salon at home! 

Though it is available in the Etude House branches around Singapore, but I still prefer to have mine ordered and delivered right to my door step. All thanks to Qoo10, I've got my items shipped right from Korea and most of the time, even faster than the local stores can stock up!


The whole collection includes a Enamel ting LED gel lamp, Enamel ting Gel Nail Cleanser, and Enamel ting Gel Nail Remover together with 35 brilliant gel nail polishes, that allows you create all sorts of nail art and manicure.


The gel lamp is slightly cheaper than what you can find out in the market, portable and easy to use with 36 LED lights, letting you set your gel nails in 45 seconds flat. It has an internal timer that will auto turn off after 45 seconds, so that you know it is time to add another coat of colour.


I've gotten 2 colours - #5 Apple Bite (Red) and #17 Coating Jean (Blue) to try out the nail polishes. The colour payoff is amazing and it is very easy and smooth to apply. With just 1 application, you can get full shiny coloured nails. My nails are ready with 10 minutes with just 2 coats of the nail polish.


But, getting your gel nails done is not as straight forward as your usual nail polish of applying the colours coat after coat. You will also need the help of the Enamel ting Gel Nail Cleanser. Removing the gel nails is also not that fast too! Here's the steps to it...


But purchasing these gel nails materials were with an initial struggle. I was weighing the pros and cons, reading up more of gel nails manicure before deciding to get them. In fact, I still have my reservations doing gel nails again. Why? Here's my list of them...

The PROS

  • Affordable and easy on the pockets
  • Manicure that lasts 2-3 weeks
  • Chip-free
  • Fast Drying
  • Easier to create nail designs without smudges

The CONS

  • A health risk as you are constantly baking your nails under UV lamp - cancer, increased photo-aging, more wrinkles
  • Hassle for gel nails removal 
  • Filing down of the nails to break the top coat, might lead to over filing, thus making the nails thin and weak
  • Soaking in the gel remover makes nails dry

Some tips when applying gel nails at home...
  • Apply sunscreen on your hands before application
  • Buff your nails to get a better surface for the gels to stick to, ensuring your gel nails last longer
  • Be sure not to paint your cuticles and wipe off any that gets on your skin before curing
  • Apply cuticle oil and hand lotion once you are done.


So, what do you think? 
Would you consider giving the Etude House Enamel ting Gel Nails collection a test drive?


 photo Signature__zpsdf69aa7c.jpg


Don’t forget to stay tuned to my blog / like my blog’s Facebook page / follow me @huney_84 on Twitter & Instagram  for the latest updates!

[What's New] Come On Over To The Inaugural #ChangeDestiny Museum This Weekend!

Labels: , , , , , , , , , , , ,

Hi Huneybees,


SK-II is having an inaugural #ChangeDestiny Museum from 5th March to 11th March, at The Paragon, celebrating 35 years of heritage and innovation. There's several exciting activities to do over the weekend, check them out:

1. Discover your Skin Age
Find out your skin destiny now with SK-II, it only takes 5 minutes to decode your current and future skin! You will also receive a personalized consultation and starter kit to kick-start your miracle journey.

2. Meet Korean Celebrity Kim Hee Ae on 6th March
Meet our Living Proof ambassador Ms. Kim, who will share the secrets behind her youthful look and life after changing her destiny. Also, enjoy stunning live dance performances and stand a chance to receive our best-selling SK-II Facial Treatment Mask*. Only 20 pieces are up for grabs!
*7th March (3-5pm) & 8th March (1-3pm)

3. Be Rewarded for Changing Your Destiny
New to SK-II? Visit the #ChangeDestiny Museum, complete the challenges and receive an exclusive museum door gift. Plus, receive a full sized SK-II Clear Beauty Powder Foundation worth $130 when you purchase more than $250 worth of SK-II products. 


I'll definitely be dropping by this weekend, hope to see you there!


 photo Signature__zpsdf69aa7c.jpg


Don’t forget to stay tuned to my blog / like my blog’s Facebook page / follow me @huney_84 on Twitter & Instagram  for the latest updates!

[What's New] The M.A.C Isabel & Ruben Toledo Collection Swept Me Off My Feet

Labels: , , , , , , , , , , , , , , ,

Hi Huneybees,


I swept them all up like a #Toledo! This is a very exciting collection from M.A.C as they collaborates with fashion’s most romantic couple - Isabel and Ruben Toledo!

"They are renowned for their award-winning and imaginative work in fashion design and illustration. This unique collaboration with M·A·C pairs Isabel’s sensational penchant for colour with Ruben’s vibrant energy in a palette of hues designed to sculpt, paint and transform the face. Specially designed white packaging features Ruben’s illustrations, an array of graphic lines and red-lipped faces brought to life with his one-of-a-kind aesthetic.”
 

I'm already a M.A.C addict and when you start throwing colours and nicely designed packaging at me, I would fall head over heels uncontrollably. I splurged like a Toledo (*Tornado, get it?) and there was no regrets at all!


I didn't sweep up the whole collection, but here's some swatches I took in store, before I share with you a tutorial with the ones that I have. 
*These are limited editions, so some of them might have already been swept up at the launch ~


So for the eyes, there are 3 palettes - Bellgreens, Moodyblu and Violetwink. I have the Bellgreens, so I would be sharing them later, but here's the lovely blue palette - Moodyblu and purple pink palette - Violetwink.


The more fun and surprising products have got to be the coloured eyeliners and mascara, that will be so inviting for the summer time fun under the sun!


And if you are a fan of gradient blushers, you have got to get these 3 shades of lovely blushers ranging from soft pink to peach for that sun-kissed look.


And like I told you, colours are major in this collection, choose from a range of 6 lipsticks and 6 lip glosses to complement that beautiful eye makeup of yours. Oxblood was a top favourite that night and I was glad I managed to snag one for myself! Yipee!


In the collection are also 3 shades of nail polishes - Faint of Heart, Venus Red and Vixen, as well as a Powder Blush Brush that comes with a pouch and a unique Makeup Bag that features all the wonderful graphics of the collection.


On the day of the launch, I also got a little makeup touch up with the lime green Chlorafill eyeliner and Sin on my lips. Hehehehe, that sounded kinda badass eh? So what do you think of the look? I will share more of the video once I'm done with the editing. Stay tuned k?


 photo Signature__zpsdf69aa7c.jpg


Don’t forget to stay tuned to my blog / like my blog’s Facebook page / follow me @huney_84 on Twitter & Instagram  for the latest updates!